


7 RV Water Filter Mistakes That Wreck Flow (and How to Fix Them)
![[HERO] 7 RV Water Filter Mistakes That Wreck Flow (and How to Fix Them)](https://cdn.marblism.com/DmI8QihE5N2.webp)
Maybe you recently added an RV water filter system to your setup. The water tastes great. Life is good.
Then one morning, your shower turns into a sad trickle. The kitchen faucet takes forever to fill a pot. You're standing there wondering what went wrong.
Here's the thing , most RV water flow problems aren't caused by bad equipment. They're caused by simple mistakes that are easy to make (and thankfully, easy to fix).
Whether you're running one of our Essential, Enhanced, or Elite filtration systems , or any multi-stage setup , these seven mistakes can seriously reduce your flow rate. Let’s walk through the fixes.
Mistake #1: Letting Your Sediment Cartridge Get Too Clogged
This is the most common flow killer, hands down.
Your sediment filter is the first line of defense. It catches sand, rust, dirt, and all the gunk that would otherwise destroy your carbon filters downstream. But here's the catch: as it does its job, it gets clogged. And a clogged sediment cartridge chokes your entire system.
The fix: Check your sediment cartridges regularly , especially if you're camping at older parks or boondocking with questionable water sources. If flow drops noticeably, it’s usually a good sign it’s time to swap it out. Rather than sticking to a rigid schedule, let your actual flow and filter appearance guide you.
Most RVers need to replace sediment filters every 3–6 months, but heavy use or dirty water can cut that timeline in half.
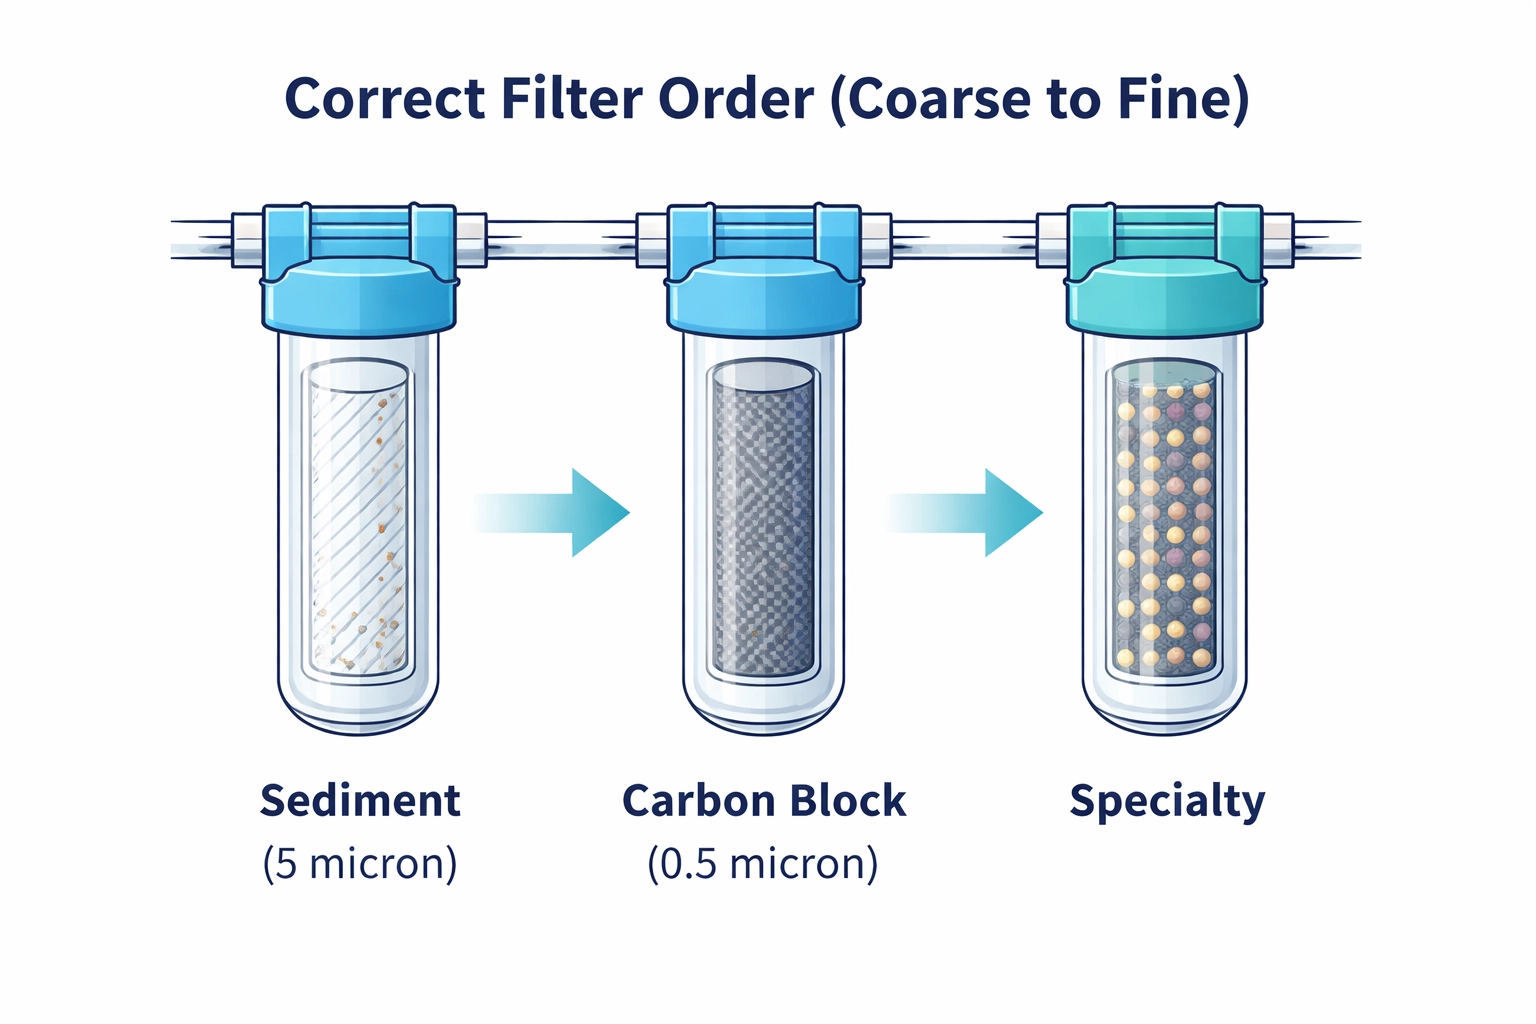
Mistake #2: Installing Filters in the Wrong Micron Order
Not all filters are created equal. A 5-micron sediment filter catches bigger particles. A 0.5-micron carbon block filter catches tiny contaminants. If you stack them in the wrong order, you end up asking the fine filter to do the heavy lifting , and it can clog a lot faster.
The fix: In most setups, you’ll want to go from coarse to fine. Sediment first, then carbon. If you're running a multi-stage system like our Essential, Enhanced, or Elite setups, the stages are already designed in the correct order. Just make sure you're putting the right cartridge in the right housing during replacements.
Mistake #3: Ignoring Your Water Pressure Regulator
Wait , what does a pressure regulator have to do with flow?
More than you'd think. If your incoming pressure is too low (say, under 40 PSI), your water has to work harder to push through each filter stage. The result? Weak flow at your faucets.
On the flip side, if you skip the regulator entirely and hook up to a high-pressure source, it can put extra strain on your system : and your RV's plumbing.
The fix: An adjustable water pressure regulator can help you dial things in, and many RVers find around 50–60 PSI is a comfortable range for balancing protection and flow. If you like to keep an eye on things, adding a pressure gauge makes it easier.
Mistake #4: Kinked or Pinched Inlet Hose
This one sounds obvious, but it happens all the time : especially when you're setting up camp in a hurry.
A sharp kink in your water hose restricts flow before it even reaches your filter system. You might not notice right away, but your shower definitely will.
The fix: Use a quality RV drinking water hose that resists kinking. Check behind your rig and around tight corners. If you're using a coiled hose, make sure it's not twisted or collapsed. If you’re looking to tidy things up or reduce restrictions, our hose accessories collection includes options designed to stay open under pressure.
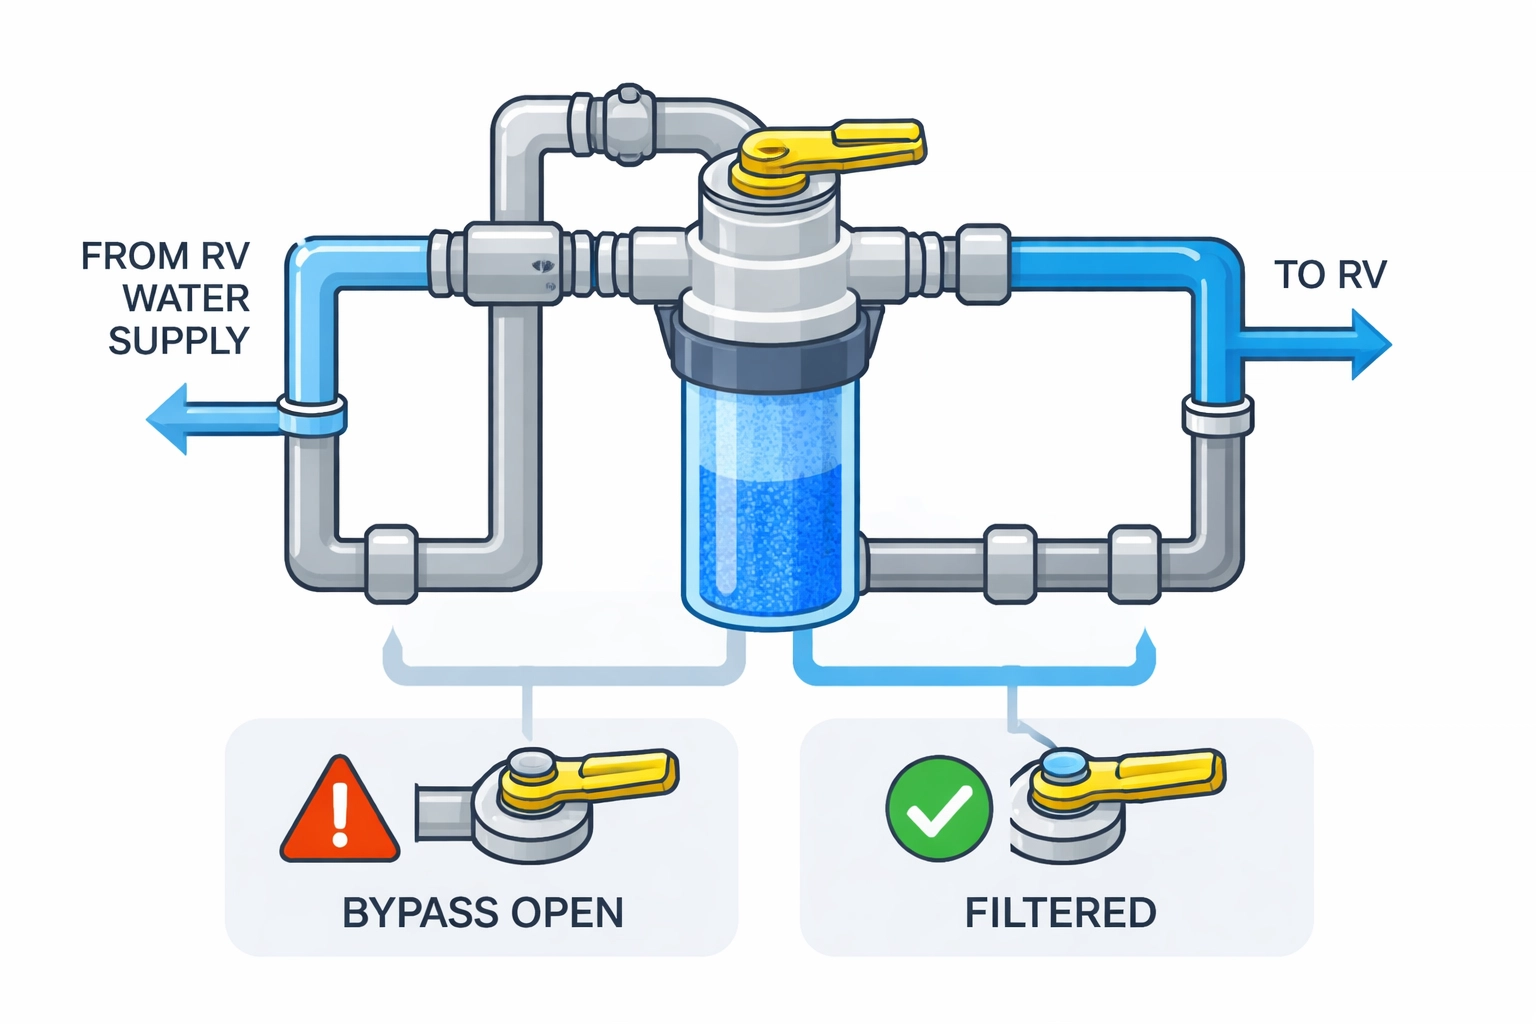
Mistake #5: Leaving the Bypass Valve Open
If your filter system has a bypass valve (many do), it's there for winterization or maintenance. But if you accidentally leave it open : or partially open : water takes the path of least resistance and skips the filter entirely.
You might not notice a flow problem per se, but you may not be getting fully filtered water. And if it's only partially open, you could see inconsistent pressure.
The fix: Double-check your bypass valve every time you set up. In normal use, it’s typically fully closed. This is an easy one to overlook after winterizing or flushing your system.
Mistake #6: Installing a Cartridge Backwards
Some filter cartridges are directional. They're designed for water to flow in one end and out the other. Install it backwards, and you may end up with reduced filtration, restricted flow, or both.
This is especially common with carbon block cartridges and certain specialty filters.
The fix: Look for the flow direction arrow printed on the cartridge. Match it to the flow direction of your housing. If there's no arrow, check the product instructions. If you’re comparing options, our carbon cartridges and specialty cartridges pages include specs that can help you confirm compatibility and orientation.
Mistake #7: Freezing Damage You Didn't Know About
If you've ever stored your RV over winter without properly draining your filter system, there's a chance ice did some internal damage. Frozen water expands : and that expansion can crack housings, rupture cartridges, or warp internal seals.
You might not see a leak, but flow restriction can sneak up on you.
The fix: If you’re expecting freezing temps, winterizing your filtration system ahead of time can prevent a lot of headaches. Drain housings completely and remove cartridges for storage. If you suspect freeze damage, inspect your housings for hairline cracks and consider replacing any cartridges that may have been compromised.
Bonus Tip: Too Many Inline Filters in a Row
More filtration isn't always better. Stacking multiple inline filters back-to-back might seem like extra protection, but each one adds resistance. String together three or four, and you'll feel it at the faucet.
The fix: Stick to a well-designed system that matches your water conditions and how you travel. Our Essential, Enhanced, and Elite systems are designed to balance filtration quality with flow rate, so you can often avoid stacking extra filters unless you have a specific reason.
When to Replace Your Cartridges (Quick Reference)
| Cartridge Type | Typical Replacement Interval |
|---|---|
| Sediment | Every 3–6 months (or sooner if visibly dirty) |
| Carbon Block | Every 6–12 months |
| Specialty (fluoride, iron, etc.) | Per manufacturer recommendation |
Of course, these timelines depend on how much water you're running through and the quality of your source water. If you’re not sure, a quick visual check (and paying attention to flow and taste) usually tells you when it’s time.
If you want to browse options, our full filter cartridges collection includes replacements for our systems and most standard housings. And if you prefer a set-it-and-forget-it approach, our Subscribe & Save program can help you stay on track for routine cartridge changes.
Wrapping Up
Low water flow in your RV is frustrating : but it’s often fixable. Start with the sediment filter (it’s a very common culprit), then work through the list above.
A little maintenance goes a long way. And when your system is dialed in correctly, you can get clean water and solid pressure.
Got questions about your setup? Contact us ( we’re happy to help you troubleshoot and figure out what makes sense for your rig.)


